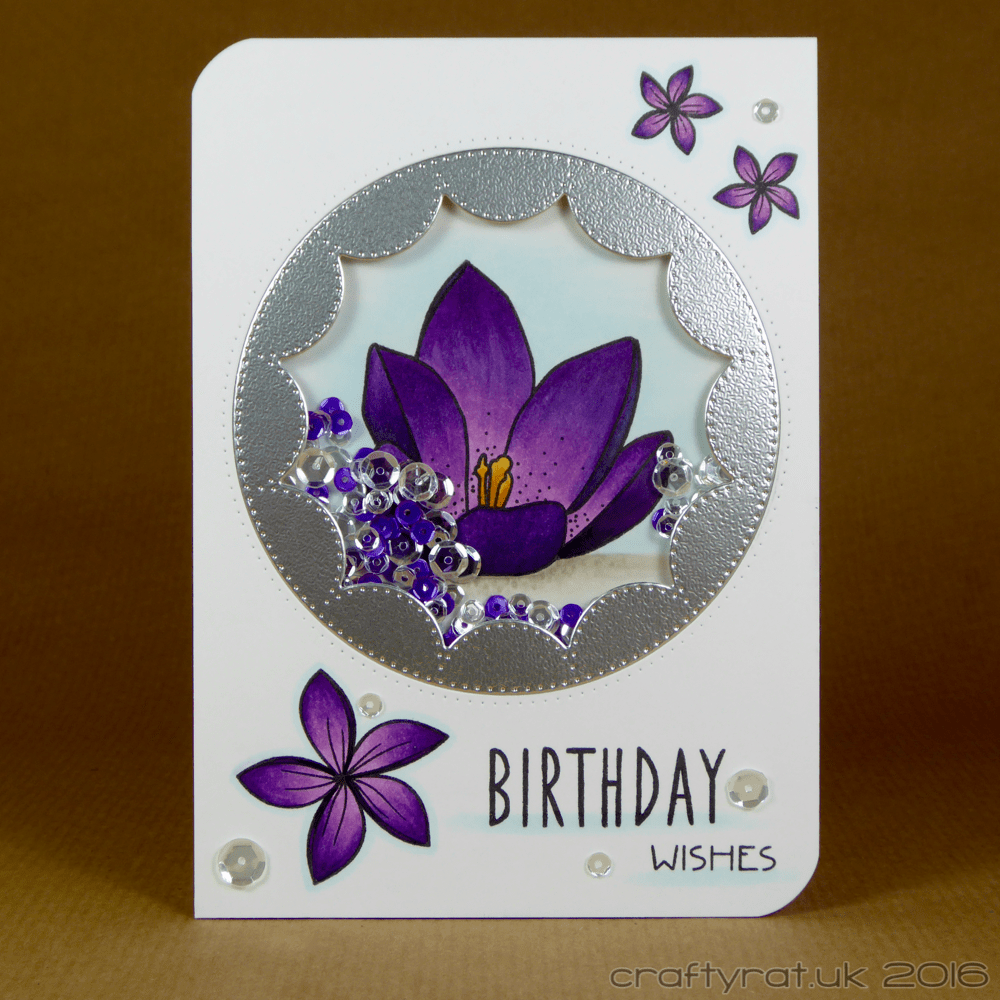
Create A Smile is celebrating its second birthday and this month’s challenge is, fittingly, to create a birthday card. That gave me a really good reason to finally ink up the crokisses stamp set, which I absolutely love, but haven’t got around to actually using yet… I also decided that a shaker card would work nicely with the layout I had come up with.

How:
New tool: I recently cut myself an A6 piece of thick acetate which I now use to help me refine card layouts. A6 because that’s the most common card size I create and acetate because stamps stick to it and I can lay it over patterned paper or other elements to see how things will layer together.
Once I’d got my layout sorted, I started by die-cutting the aperture in the main panel and also the silver scalloped circle. I prepped a couple of squares of acetate and a square of Neenah for the large crocus.
The sentiment and flowers were stamped on their respective panels and, after a quick Google to check what crocuses look like, coloured with Copic markers.
Then I had to assemble the shaker. I taped one piece of acetate behind the aperture and glued the silver border in place on the front. Then I created the wall of the shaker with some narrow foam tape and added a selection of sequins.
At this point some people would just lay the back panel of the shaker over the face-down open shaker and it would all line up perfectly. I can’t do that. To even contemplate attempting that would be to court disaster. So I stick another piece of acetate over the back instead. This way I can turn the shaker over, position it perfectly over the large crocus and tape that in place. Then, after adding more foam tape around the edges of the panel, the whole thing can be mounted onto a card base.
My almost finishing touch was to add a few sequins scattered across the front.
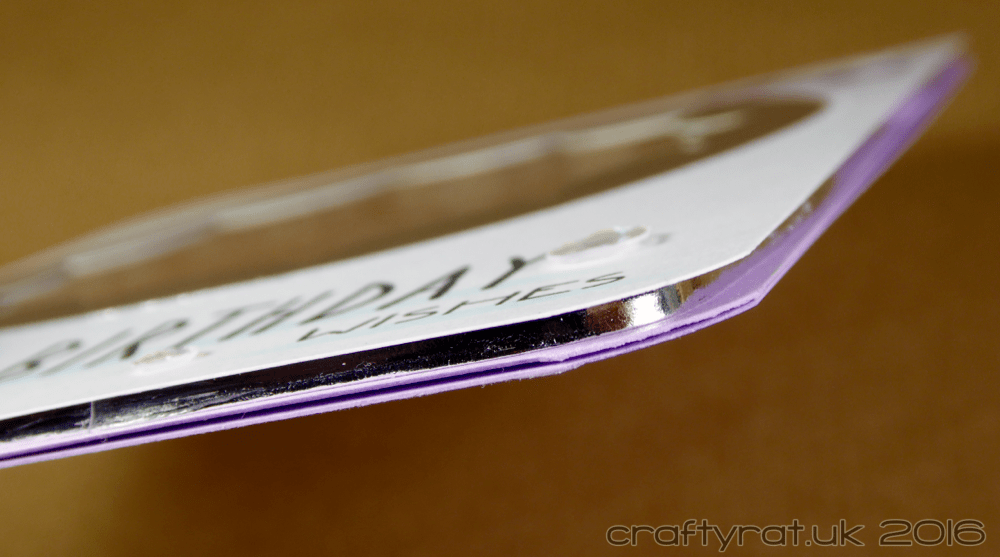
I say “almost” because there is one thing that annoys the perfectionist in me about creating shaker cards and that is the edges. On regular raised panel cards I can get the foam tape to look pretty neat from the sides, but with shakers, especially where the shaker is quite close to the edge, I tend to end up with a bit of a patchwork and it looks untidy. And if I’ve put in all that effort to make the front look nice, I don’t want the edges to look scruffy. And then I remembered I had some thin silver (to match the front) border tape. And it was just the right width. So I spent a few minutes with the card wedged between two agate bookends, prodding the tape into position with some tweezers. And it worked!
Much nicer… Now it’s finished…

Challenges:
Supplies:
- stamps:
Create A Smile – crokisses
Create A Smile – mini birthday - dies:
Waffle Flower – flower circles inverted - inks:
My Favorite Things – hybrid ink – black licorice - Copic markers:
flowers (outside) – BV29, V09, V17
flowers (inside) – V09, V17, V15, V12
flowers (stamen) – YR21, YR24
shadow – W00, W1, W3
outlines & sky – B0000 - embellishments:
Pretty Pink Posh – sparkling clear mix
Pretty Pink Posh – 4mm sequins – sparkling clear, amethyst
Neat & Tangled – 6mm – crystal clear
Stix2 – border lined tape – bright silver - paper and card:
Neenah solar white 216gsm
Papermill Direct – smooth – lilac
Papermill Direct – sandgrain – silver
acetate
Discover more from Crafty Rat
Subscribe to get the latest posts sent to your email.

Beautifully done. I use my Fuse tool for most of my shakers now, because I never could get them right with other methods. Like you I used acetate on the back and front – so many times I got them messed up. I love the use of the silver border too – really clever. xx
LikeLike
Doh! Completely forgot about my Fuse tool! Just went on autopilot and immediately reached for the foam tape… Next time… 🙄
LikeLike