Sometimes an idea will pop into my head; often triggered by a barely seen something that just whizzed past my eye. It’s not fully formed, it’s definitely not a thing, but it’s the start of an experiment.
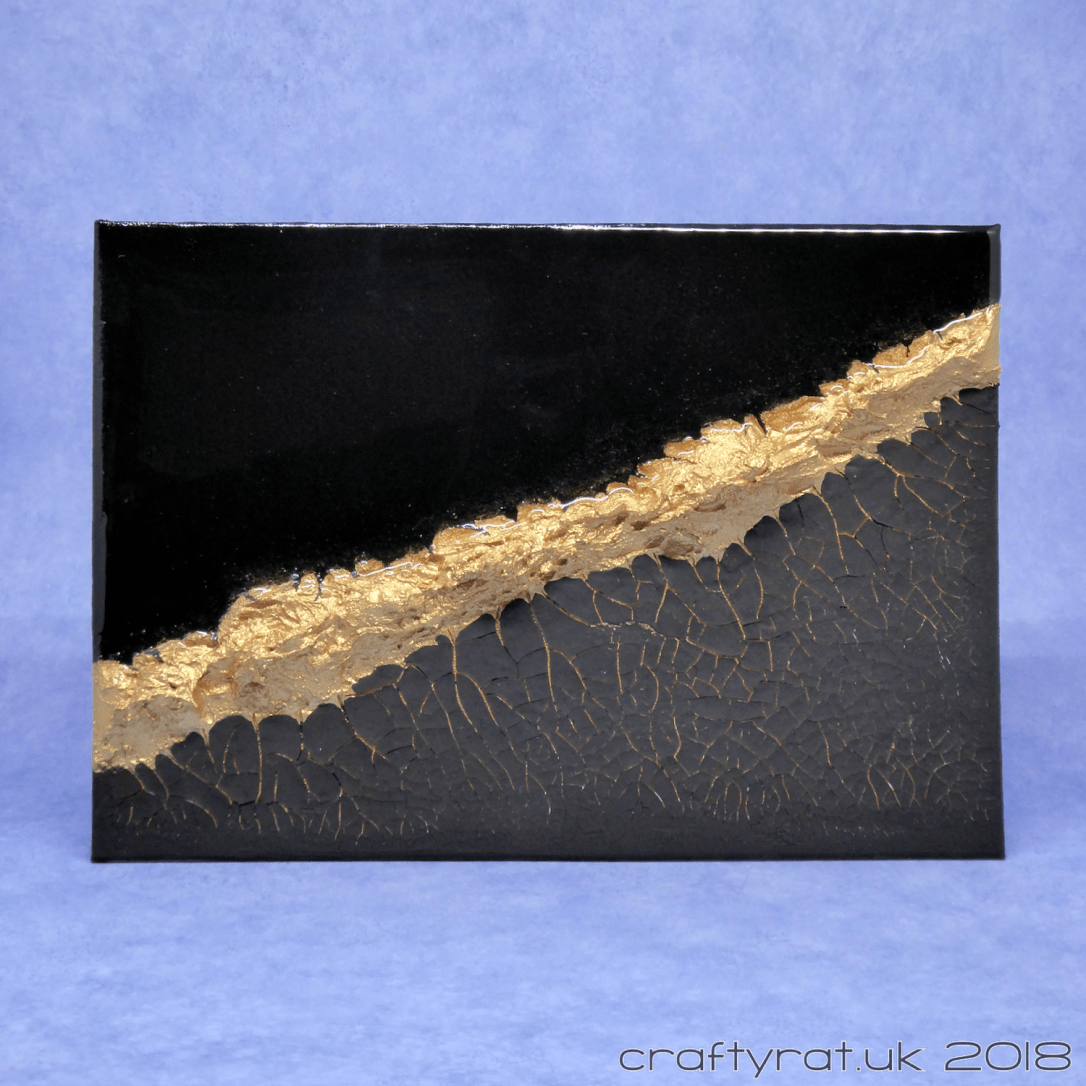
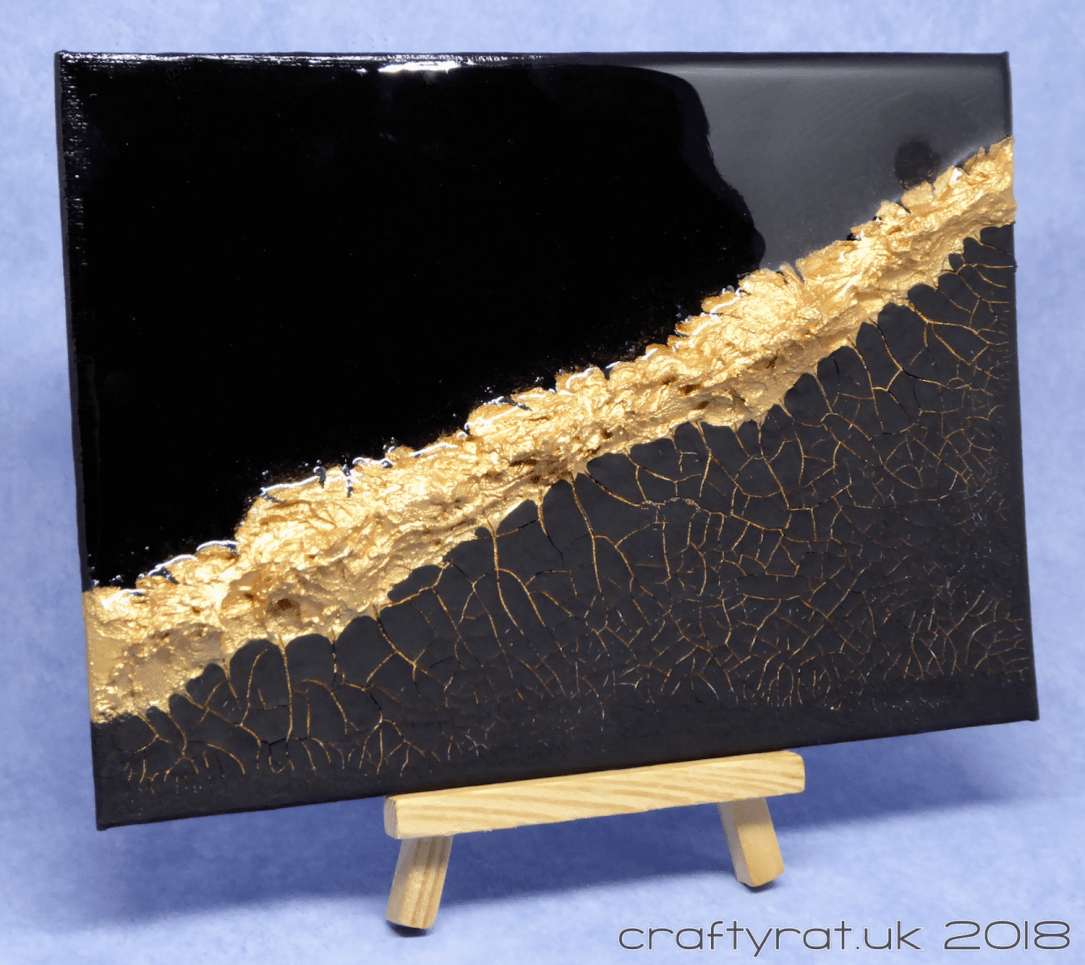
That vague idea — a golden slash across a black background — along with the need to play with some unused and little-used supplies resulted in this abstract experiment. It’s far from perfect, but I never expected my first attempt at using resin to go well (I’m impressed that it even set). And it’s not quite what I envisaged, but I think that’s a matter of scale: the same idea on a larger canvas would have more of the impact it had in my mind.
The process was theoretically straightforward: gesso panel, create and paint mountain range, paint the background, add resin glaze.

The actual process looked more like:
- Cover panel with black gesso. Let it dry.
- Create a diagonal “mountain range” with embossing paste. Let it dry (which takes a while with that thickness of paste — I left it overnight).
- Paint the range gold.
- Decide that crackle paste might look good on one side rather than leaving both smooth.
- Add crackle paste to one side of the range; thicker nearer the range, thinning out towards the edge. Let it dry.
- Experiment on some test pieces of crackle paste to decide how to paint it. Don’t throw these away (I’ll come back to them in another post).
- Paint the dried crackle paste and the plain gesso on the other side black.
- Paint the cracks gold. I have a small brush and a lot of patience.
- Paint small gold triangles to connect the cracks to the range.
- Paint small black inroads into the range to link it to the flat plain.
- Pick up the courage to mix up some of the pack of glazing resin that has been sitting on a shelf for over two years.
- Attempt to balance the panel using a small spirit level. As becomes apparent, the panel isn’t completely flat so this is impossible.
- Pour waaaaaaaaaaay too much resin on the panel. In my defence, it didn’t look like too much right up to the point that it was really obvious that it was and even then it didn’t look like it was that much too much!
- Be really grateful I put a large plastic sheet over my desk.
- Quickly find something else I can glaze (have I mentioned I hate wasting supplies?)
- Smooth a thin layer over a metal-effect test tag just to see how it turns out and because it was handy.
- Wave an open flame over the resin to remove any bubbles. I have no idea whether this helped as I am terrified of using butane torches.
- Cover the resin to try to minimise dust.
- Leave everything to set, including the mess, overnight.
The following morning. The resin had set! This is a major achievement as it is easy to get the proportions of resin and hardener wrong or to not mix them well enough and end up with a sticky mess that will never set properly.

It’s far from perfect though. Because the panel wasn’t completely flat I couldn’t get it absolutely level so the resin had pulled away from one corner. And in all the faffing around, it ended up with a few specks of dust in it, but it could have been a lot worse.
I do have the start of an idea for framing this that might mitigate a lot of the problems with the resin, but I need to ponder on that a bit further.
Or I could add another layer of resin to even everything out.
I don’t love it, but I don’t hate it either. It was definitely a worthwhile experiment in that it taught me more about some of my supplies, but I’m not sure what I will do with it next…

Supplies:
- Prep & Stick:
black gesso - Texture:
Dreamweaver white embossing paste
DecoArt crackle paste – white - Colour:
Stuart Semple – gold, black 2.0 - Paper & Fabric:
Kippers Hobby A5 artist canvas panel - Miscellaneous:
Pebeo glazing resin
Discover more from Crafty Rat
Subscribe to get the latest posts sent to your email.

Interesting!
LikeLiked by 1 person
Thanks. It was an interesting experiment and, if nothing else, I got over my fear of using the resin 🙂
LikeLiked by 1 person