
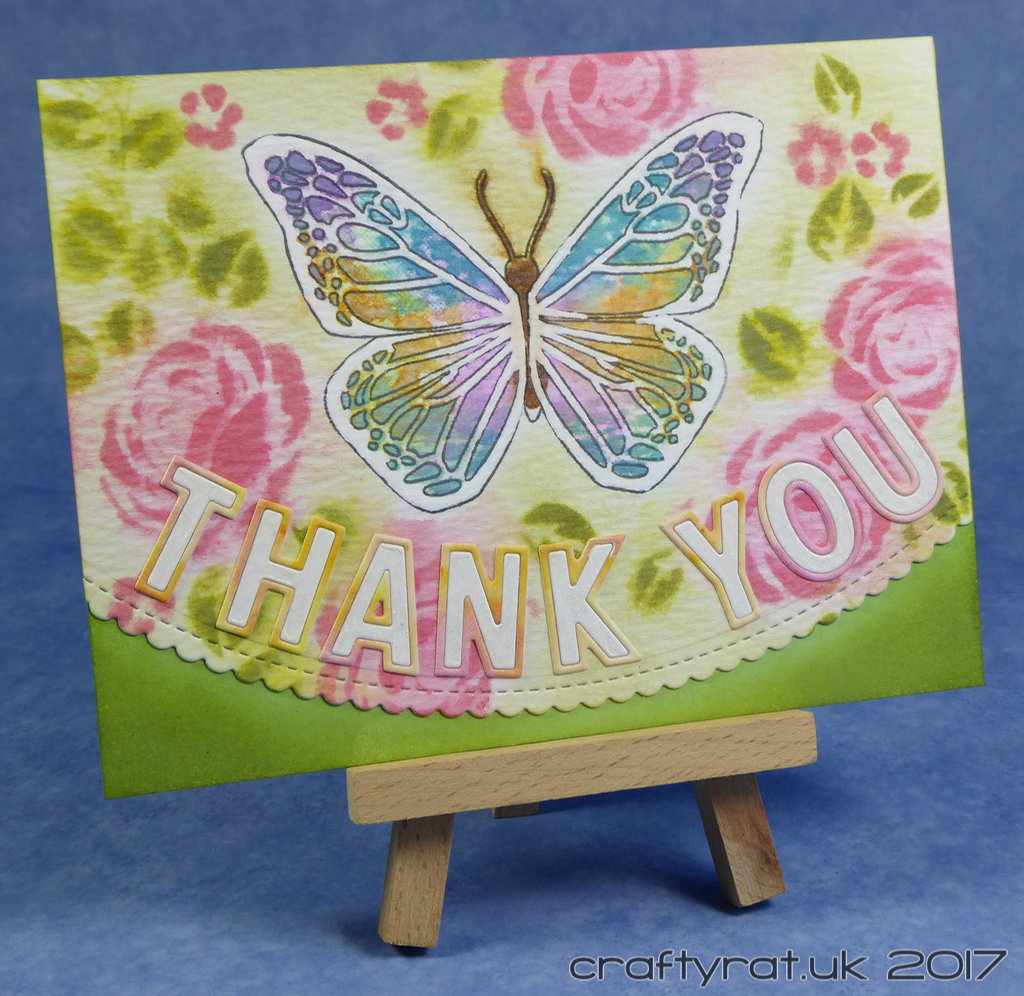
After my first experiment with the double-cut alphabet dies I had enough pieces left over to make another thank you sentiment; all I had to do was come up with a card to put it on. Cue more experimenting, this time with the new Distress oxide ink pads.
I remembered seeing a video of Tim Holtz demonstrating his new stamp platform by creating a controlled watercolour effect with a butterfly stamp and I thought I’d start by doing something similar. What I didn’t remember at the time was that he was using Distress markers (which I don’t have). But I do have a MISTI, a layering butterfly and a set of Distress oxides so I recreated the effect with those: dabbing ink onto small parts of the stamp, wiping off the excess, spritzing with water, stamping, and repeating until happy. I stamped the outline in archival ink to add some definition back and used a white Sharpie to clean up the edges.
For the background, I started by stencilling some roses and leaves around the butterfly with the oxides and then spritzed them with water (shielding the butterfly so it didn’t blend any more). I liked the effect, but it was a little too undefined, so I repeated the stencilling, this time using regular Distress inks. I tied it all together by blending a little green over the remaining white space.
I die-cut the scalloped edge and glued the double-cut thank you along the curve. Finally I mounted the panel on a card base and blended a little more Distress ink over the bottom corners.

Supplies:
- stamps:
Concord & 9th – butterfly beauty - dies:
Concord & 9th – double cut alphabet
My Favorite Things – stitched scallop basic edges - stencils:
Tim Holtz – THS075 roses - colour:
butterfly:
Distress oxides – wilted violet, broken china, cracked pistachio, spiced marmalade
background:
Distress oxides – worn lipstick, peeled paint
Distress ink pads – worn lipstick, peeled paint - inks:
Ranger – archival – jet black - pens:
Sharpie – extra fine paint pen – white - paper and card:
Distress watercolour cardstock
Papermill Direct – smooth – spring green
Discover more from Crafty Rat
Subscribe to get the latest posts sent to your email.

Oh this turned out so pretty! I don’t have any of those new inks…probably won’t buy them as I don’t think I would use them enough. Thanks for sharing this card! It is really pretty! 🙂
LikeLiked by 1 person
It was around my birthday and I found a good price for the set so I treated myself 🙂 My Copics are the only thing that get lots of use (just as well given the cost of that collection!), but I do like having options for creating backgrounds…
LikeLiked by 1 person
I am not sure how the new inks work but the result is really good!
LikeLiked by 1 person
Thank you! So far the main differences from regular Distress inks are the chalk-like finish you can get with water and the way you can build layers without them turning to mud as long as you dry each layer before adding the next.
LikeLike