The start of the month brings another freebie digi stamp in the newsletter from The East Wind and another challenge; this time the theme is “in the pink”, inviting pink projects and ones supporting breast cancer awareness.
How:
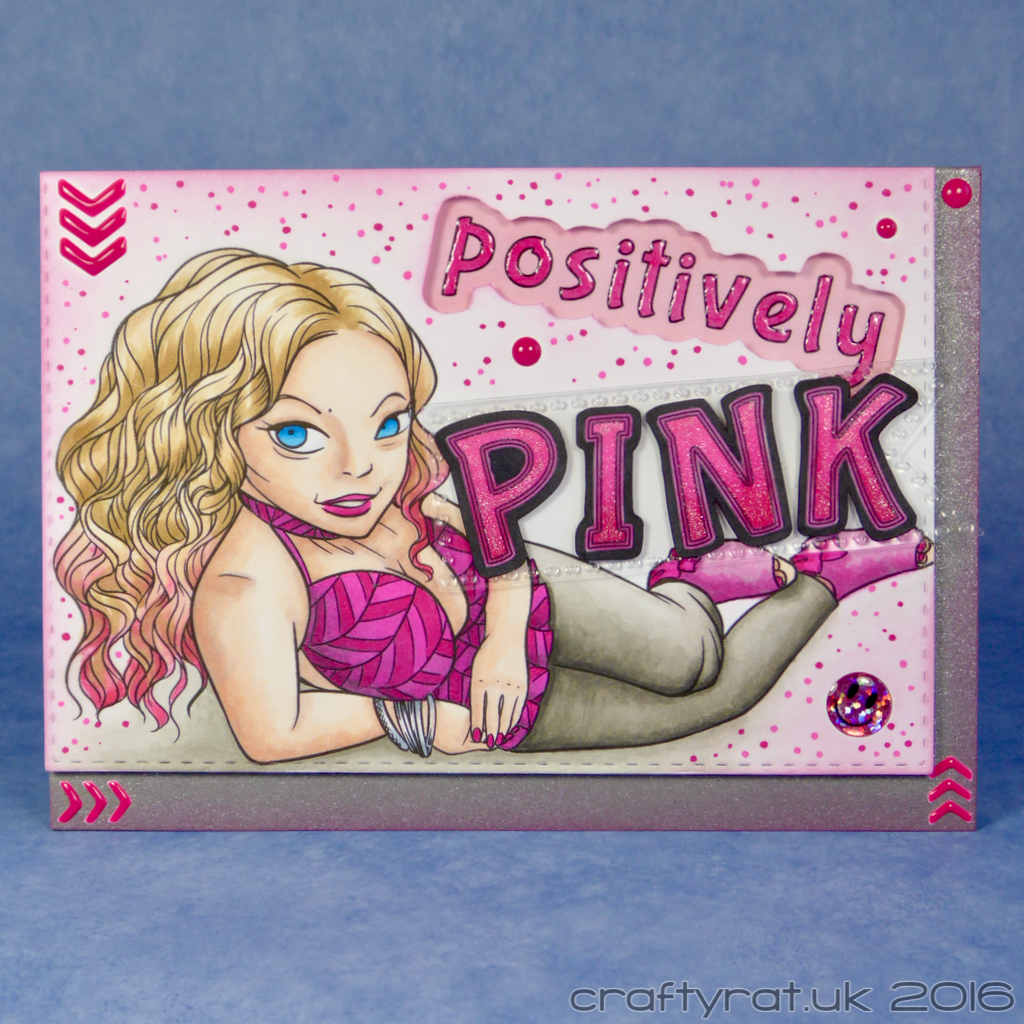
The second hardest part was choosing a sentiment, but I had a search for breast cancer awareness slogans and “positively pink” caught my eye. Then I got the hardest part of this design out of the way: choosing a font for the sentiment. For a change I quickly found one I liked and didn’t have to spend hours scrolling through typefaces. Once I’d figured out my rough layout, I sized the image and lettering to fit and printed them out on Neenah solar white — one of these days I’ll maybe pick a different medium to use for a challenge card, but at the moment I’m a happy bunny with my Copics.
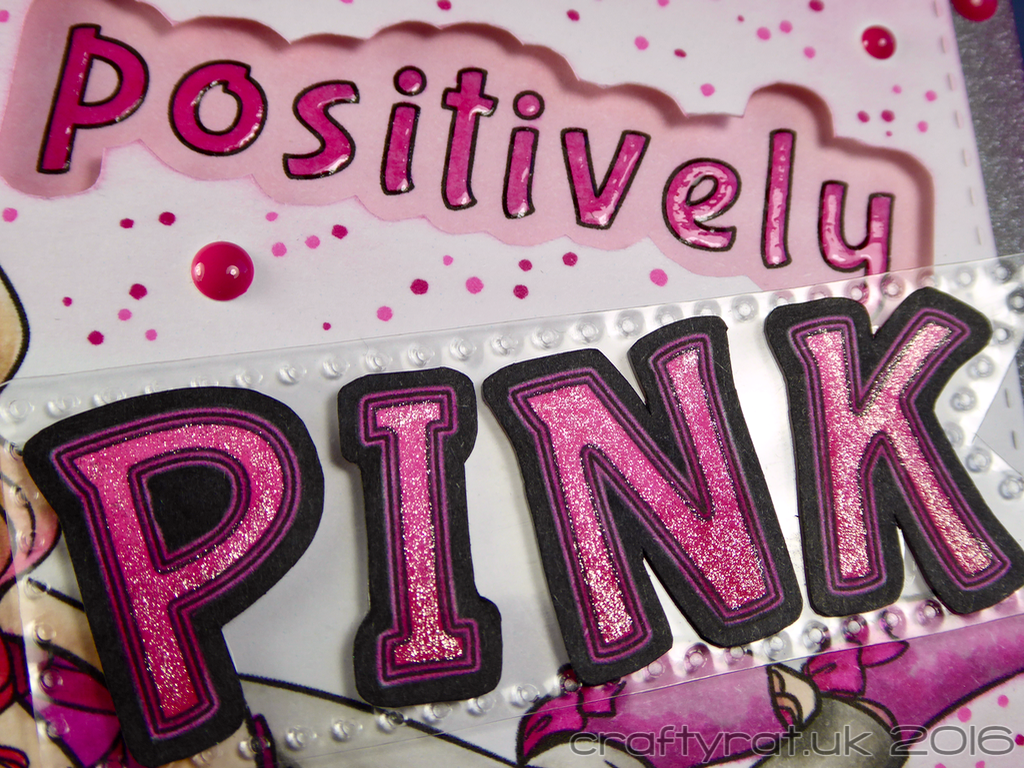
When coming up with the layout, I decided that I wanted to recess the word “positively” and pop up “pink, so there are three different levels to the card. To make this easier I also printed out the “positively” with a border around it to use as a template for cutting a window in the image panel. I used a craft knife to cut out the window before I started doing any colouring; I didn’t want to risk ruining it by slipping with the knife… I also cut the panel down to size using a stitched rectangle die.
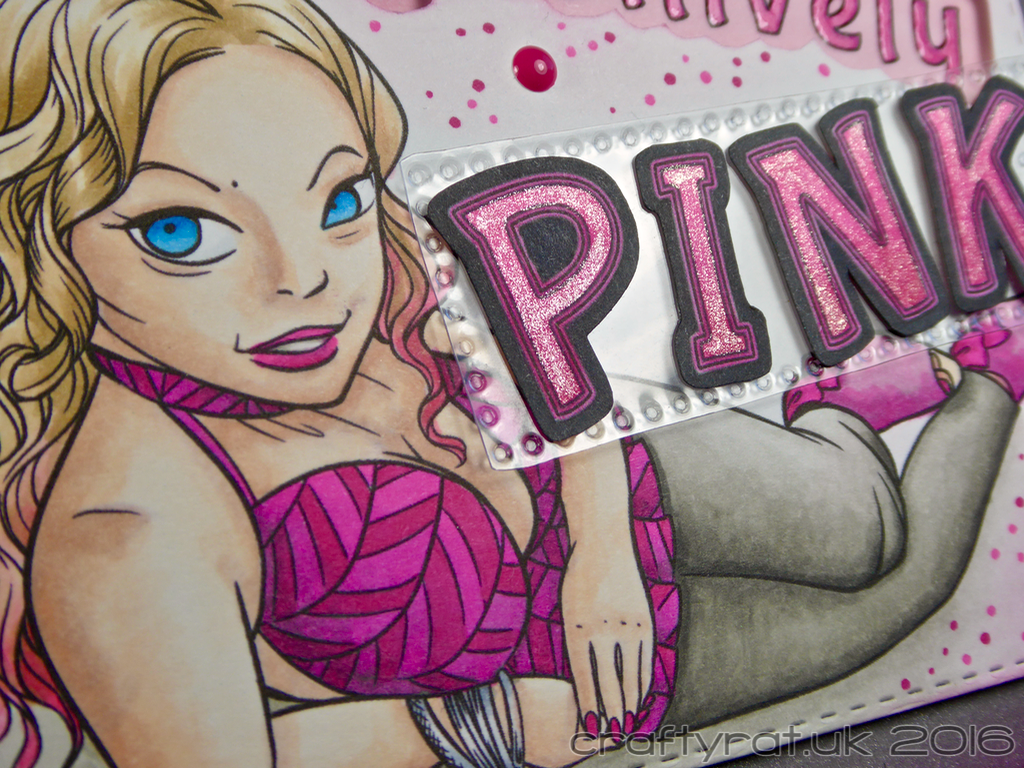
The Copic colouring was next. I created a simple gradient on the large PINK letters and used no blending at all for positively and its background. Colouring Ashley was pretty straightforward, the only thing I did slightly differently was the colouring on her top. I wanted to colour the zigzag pattern in two shades of pink, but I didn’t want the headache of trying to work out how to add the shadows as I laid down the pink, so I did my shading first by adding a grey shadow layer; that way I could simply colour in the pink over the top of the grey.
To fix the positively in place I first added some foam tape all over the back of the panel, then removed the liner paper from the pieces around the edge of the window, turned it over and carefully positioned it over the word. With that in place, I added bit of double-sided tape on the back of it, removed the rest of the liner tape, and positioned the panel on the card base.
I fussy cut out the PINK letters and used Scor-tape to adhere them to the die-cut acetate banner. I hid some small bits of foam tape behind them and popped the banner up on the card.
At this point I thought that the card was pretty much finished, apart from the addition of the pink enamels and the smiley face sticker.
But I wasn’t happy. It was nice, but it was missing something. The white space just felt too white for the layout.
And so began the game of cardmaker’s chicken; adding elements until either I liked the result or completely wrecked it.
So… dots. Dark pink and lighter pink dots that started out around the positively window and spread across the rest of the card until the only white card left was hiding underneath the pink banner. Still not happy; now there’s too much contrast between the white card and the dots.
So… light pink Distress ink blended in from the edges of the white card and a darker one on the edge of the grey card base. Much happier. I could have left it here, and in fact I did put this version on Instagram and then left it overnight.
But… There’s no sparkle. And we need some sparkle. And I seriously love the coat of Wink of Stella I added to the PINK letters. But now positively looks a bit limp.
I did think twice about the practicality of adding a thin layer of glossy accents to the recessed letters, but luckily I have a pretty steady hand and I got away with it.
And now, finally, it is finished.
Challenges:
The East Wind – #64 In the pink
Supplies:
- digital stamps:
The East Wind – Ashley in the pink - fonts:
Bubblegum Sans - dies:
Create A Smile – double stitched rectangles
Avery Elle – dotted elements - inks:
Distress ink pads – spun sugar, picked raspberry - Copic markers:
positively – RV09, RV11
pink – RV04, RV06, RV09, 110
shadow – W00, W1, W3
background dots – RV04, RV09
Ashley
skin – E0000, E00, E11, BV000
eyes – B02, B04, B06
lips – RV06, RV09
nails – RV09
hair – E50, E51, E53, E55, RV11, RV13, RV14
top – W1, W3, W5, RV09, RV06
jeans – W0, W1, W3, W5, W7
shoes – RV02, RV04, W0, W1, W3
ribbons on shoes – RV06, RV09
bangles – C0, C2, C4 - embellishments:
Create A Smile – enamels
smiley face sticker - paper and card:
Neenah – solar white 216gsm
Papermill Direct – pearlised – grey
Hunkydory – heavyweight acetate - miscellaneous:
foam tape
Scor-tape
Discover more from Crafty Rat
Subscribe to get the latest posts sent to your email.

Love it and love the sparkle!
Thanks for joining our fortnightly challenge here at The East Wind. Hope you will join us next time DT Crafting Vicky.
LikeLike
Sarah, I thoroughly enjoyed reading about your process in this post. There is so much detail in your design and the thought that went into each element was very inspiring. It turned out gorgeous with the dots, sparkle, height variation…and of course, your beautiful colouring. Thanks for playing along with our In the Pink challenge at The East Wind. I’m so glad I visited today.
LikeLike
Positively gorgeous! Wonderful that you have shared your great artwork with us here at THE EAST WIND. Good luck hun and do come back again!
Jackie DT @ THE EAST WIND
LikeLike