I swear that next month, whatever image Gerda gives us for the progressive challenge, I am just going to colour it and put it on a card base1. That was, more or less, my intention this month, but then I saw all the creative things that people were doing with this scene and I wanted to do something different if I could. I was still planning on doing something simple when I started tidying up after creating another card… and there was a spare Polaroid die-cut on the desk… doomed…
How:
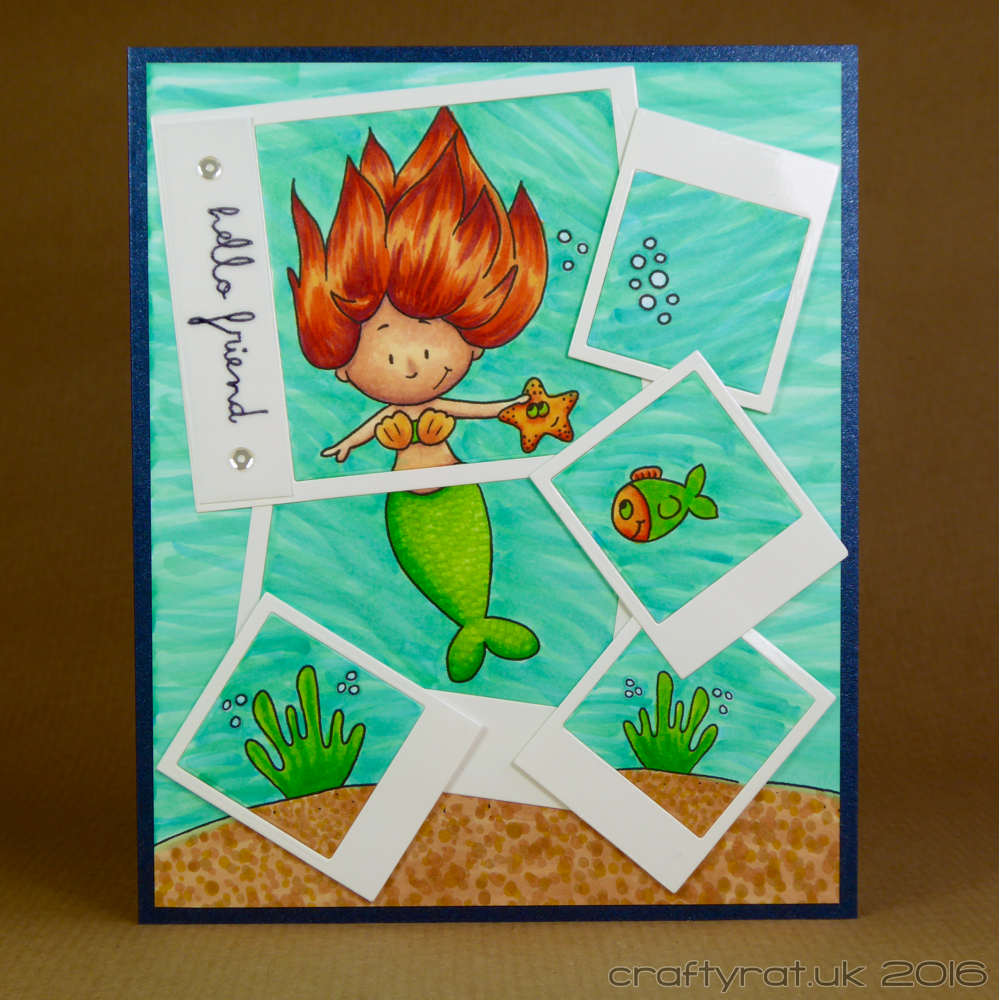
First deconstruct your scene. I separated out the different elements and printed them with (just) enough room around them to cut them out with the two sizes of Polaroid dies.
Then colour all the pieces and figure out how to make a watery background that won’t look rubbish when all the elements are brought together at slightly unpredictable angles. (Basically draw lots of curvy lines in three similar colours so that there is a feeling of movement without it being too defined.)
Die-cut the polaroid frames from glossy card. Fit the coloured panels inside them and hold them in place with a bit of sellotape.
Now comes the fun bit. Arrange the pieces so that they fit neatly together and you don’t end up with an absolutely huge card. Some time later…
Now you know how big an area the Polaroids will take up, you can create the background using the same technique as for the individual images. I think I may need to add BG34 to the Copic refill shopping list. The sea bed is simply a layer of colour covered with lots of dots of different sizes and colours.
The mermaid images were glued flat to the background and the smaller supporting images were popped up on some thin foam tape. I didn’t trust my ability — even with the MISTI — to stamp a sentiment cleanly on the gloss card, so I did it on a piece of white vellum and heat embossed it. I held that in place with some multi medium matte hidden behind a couple of small sequins.
The whole thing was mounted on a dark blue pearlised card base, leaving a thin border. And now I need to go make a custom envelope for it.
I don’t know who will get this, but it will definitely be someone who really appreciates mermaids 🙂

Challenges:
- Gerda Steiner Designs progressive challenge – July
- The Daily Marker 30 Day Colouring Challenge
Supplies:
- stamps:
Tim Holtz – crazy talk - digital stamps:
Gerda Steiner Designs – mermaid - dies:
Mama Elephant – polaroid fun - inks:
ranger – archival – jet black - Copic markers:
skin – E50, E00, E21, E11, E04
hair – YR21, E97, YR09, R39
tail – YG25, FYG2, G09
bikini top – YR21, E97
starfish – YR21, E97, YR09, YG25 (eyes)
fish – YR21, E97, YR09, YG25, FYG2
seaweed – YG25, FYG2, G09
sea bed – E33, E55, Y26
water – BG34, BG13, BG45 - embossing powder:
Wow! – superfine – clear gloss - embellishments:
Pretty Pink Posh – sequins – 4mm – sparkling clear - paper and card:
Neenah solar white 216gsm
Glossy card
Craftwork Cards – pearl – kings blue
Anita’s white vellum
- Or I’ll just come up with some ridiculously complicated idea and do that instead. ↩︎
Discover more from Crafty Rat
Subscribe to get the latest posts sent to your email.

Wow!!! What an amazing card!!!! So many amazing details…amazing coloring! Love the Polaroids!!
LikeLike
You crack me up!! I have to say though, that the whole thing was worth it. It really comes together well and I love the snap shots of the different parts of the mermaid and the sea. The background is really fabulous!
LikeLike
Great take with the Image !! Love the photo die cuts – it makes your card very interesting !!
LikeLike