
For this Copic Jumpstart homework, Sandy challenged us to get our flower stamps out. Rather than trying to create loads of dimension on each petal, I chose to go with the more pastel approach, mainly because I usually go for stronger colours and contrast and I wanted to stretch myself by doing something out of my comfort zone.
How:
I started by choosing some nice light peachy orange colours for the dahlia petals. For each petal, I laid down some colourless blender around the edge to soften the transition from white to orange and added the darkest colour at the base of the petal. I picked some light pinks for the small flowers and buds and, again, left a touch of white on the edges. I kept the colouring of the leaves really simple; the smallest were a single colour, the larger ones were two with minimal blending. A pale blue outline finished off the colouring.
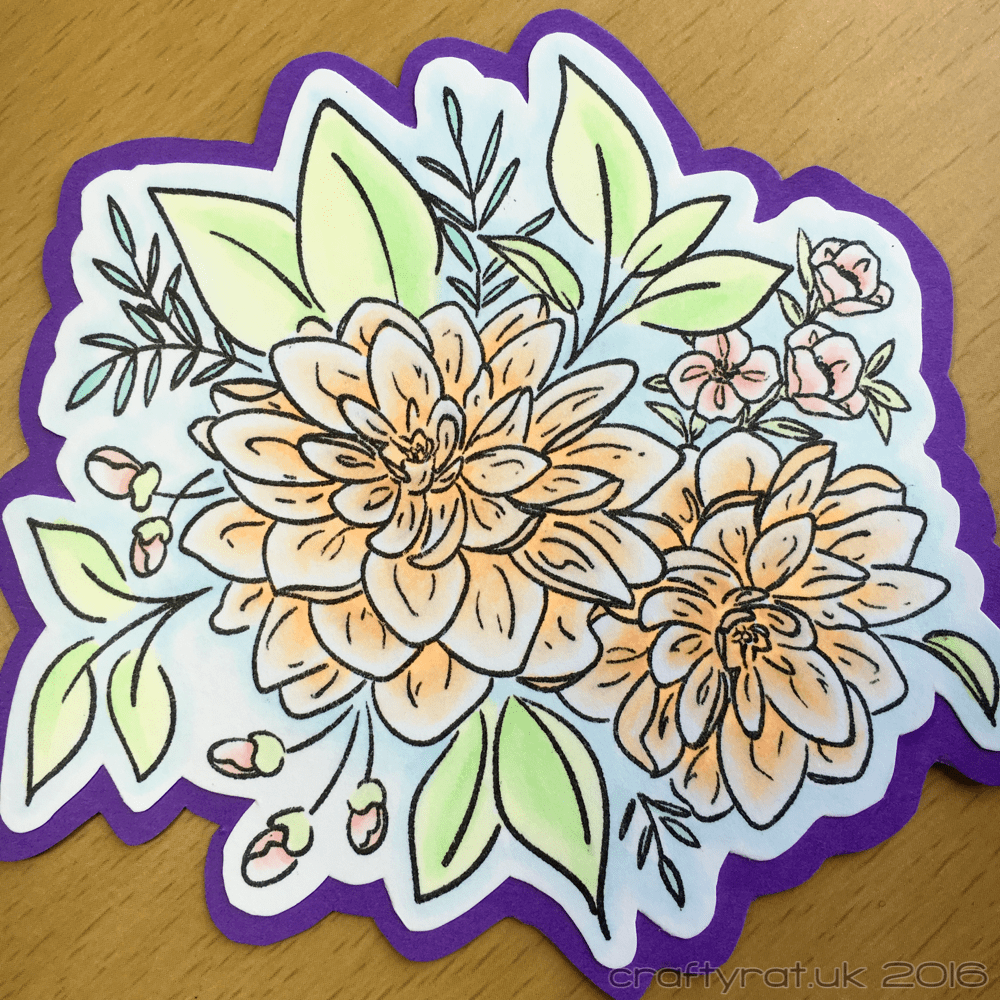
Then I had to decide what to do with the finished bouquet. Sandy split hers in half and created a horizontal arrangement; I decided to be brave and cut mine up too, trimming it to fit in the corners of my card. First I fussy cut the flowers and quickly realised that they would need something to set them off from anything other than a plain dark background, so I layered them on to some purple paper and fussy cut that too. Then, with a very steady hand and a light touch, I cut it in two with a craft knife and trimmed enough off each piece to create a clean corner with no visible mat.
I die cut the “thanks” three times from dark blue, purple and white card. I used the same orangey colours to create a gradient on the white one. To make it easier to blend smoothly, I put the “thanks” back into the die cut negative, giving me a flat surface to colour across. I layered the three pieces together, slightly offset to create a shadow effect.
Once I’d chosen some patterned paper for the background, I added that to the card base and glued the flowers in place. I cut a strip of vellum to go behind the sentiment and added that with some vellum tape runner; it’s not completely invisible behind the vellum, but it’s definitely good enough as long as you run it evenly along the full length of an edge.
I glued the “thanks” on with some Ranger multi medium matte and left it to dry with a weight on it. My trusty agate bookends may be overkill, but they do a great job of flattening things while glue dries. The last touch was to add a scattering of mixed size sequins across the card.

Class:
Supplies:
- stamps:
WPlus9 – beautiful bouquets: dahlia - dies:
Lil Inker – thanks - inks:
Memento – tuxedo black - Copic markers:
orange flowers – 0, E50, YR20, YR82
pink flowers – 0, R00, R30, R20
leaves – YG0000, YG11
leaves – G20
leaves – G00
background – B0000
thanks – 0, E50, YR20, YR82 - embellishments:
Pretty Pink Posh – sequins – sparkling clear mix - paper and card:
Neenah – solar white – 216gsm
Paperchase – spectrascope card – purple
My Favorite Things – paper pad – tranquil textures
Hunkydory – adorable scorable
Dovecraft – premium vellum
Discover more from Crafty Rat
Subscribe to get the latest posts sent to your email.
