What:
It’s that time of year when I have to come up with an idea for a birthday card for my other half. It had to have a shaker element, as he has liked the ones I’ve done so far (and didn’t want to give away the first one I did). He likes sci-fi and bad movies, so robots were an obvious choice. And then there’s the daily coffee so… robot bearing coffee!
How:
This took a while. mostly because I was making up the details as I went along.
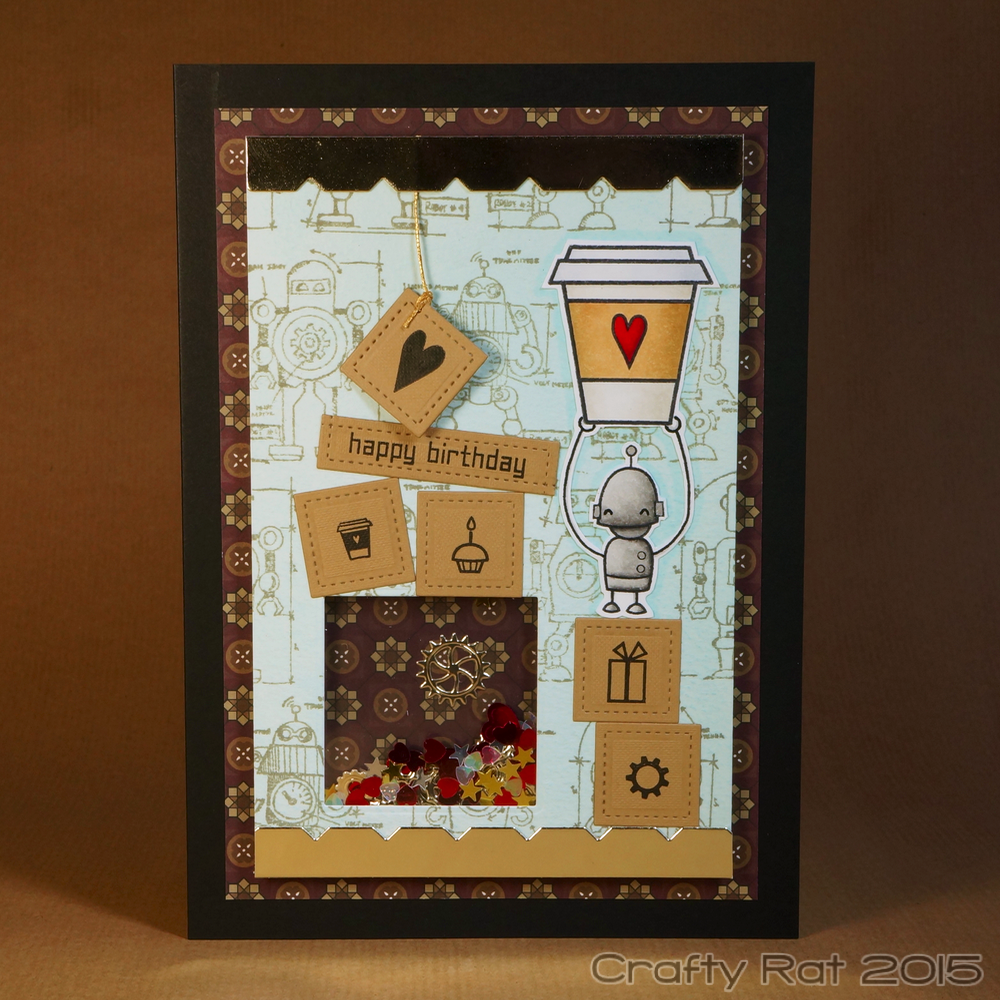
The first step was making the background pattern. Well, actually, the very first step was testing various inks to see how they reacted with water as I was planning to add a simple colour wash over the stamping. Once that was done and I’d settled on using Hero Arts shadow ink, I stamped a selection of Tim Holtz mini robots in a repeating pattern and used Distress inks for the wash. Then I put it to one side to dry completely.
The robot was made to carry the coffee by first stamping the coffee cup, then stamping the robot — minus its arms — underneath it, and finally drawing in the arms by hand with a Copic-friendly pen. Because of the high potential for messing it up, I fussy cut it out before colouring it with Copic markers.
Next up was some die-cutting: the notched borders for the top and bottom of the panel, the squares for the boxes, the gears to go in the shaker, and of course the shaker window itself, in both the background paper and two pieces of fun foam.
Once the small elements had been stamped on the boxes, it was time to assemble the card. I glued all the elements in place on the background panel and added a piece of acetate behind the shaker window. Then the two fun foam panels were adhered behind, carefully lining up the shaker apertures. A selection of confetti hearts and stars were put in the shaker, along with the die-cut gears, and a second piece of acetate was added to hold the contents in place. I trimmed a sheet of patterned paper to size and used some tape runner to attach it to the card base. The main panel was attached with double-sided tape.
Lessons Learned:
Multi-medium matte doesn’t do a good job of gluing pieces of fun foam together (though leaving it longer to dry may work).
Supplies:
- stamps:
Lawn Fawn – beep boop birthday
Create A Smile – coffee first - dies:
Lawn Fawn – stitched squares
My Favorite Things – notched border
Memory Box – mini gears - inks:
Memento – tuxedo black
Hero Arts – shadow ink – wet cement
Distress ink – tumbled glass
Distress ink – broken china
Versafine – onyx black
Lawn Fawn – lobster - pens:
Uni-ball – signo UM-153 – silver
Uni-ball – signo 307 – black
Memento – dual marker – tuxedo black - Copic markers:
robot – T0, T2, T4, T6
coffee cup – W00, W0, W1
coffee lid – C00, C0, C1
coffee sleeve – E53, E31, E55
heart – R24, R29, R39 - paper and card:
Papermill Direct – plain black
Papermill Direct – harvest buckram
Craftwork Cards – paper pad – opulence
Hunkydory – heavyweight clear acetate
Daler Rowney – The Langton watercolour paper block
Neenah – solar white
scraps of gold card for die-cutting - miscellaneous:
fun foam
assorted heart- and star-shaped confetti
Discover more from Crafty Rat
Subscribe to get the latest posts sent to your email.
